


Olga Massov
THE WASHINGTON POST – You may not think of Cornish pasties as a romantic food, but they will always remind me of the time my husband, Andrew, sort of proposed.
We were travelling in England, having dated for just a few months. It was evening and we were getting ready for bed. I remember folding a shirt to pack in my suitcase when Andrew, taking a break from his book, gazed in my direction for a few minutes and said, “I think I’d like to marry you one day.”
Trying to appear casual, I mumbled something along the lines of, “Oh, cool, sounds good,” and for the rest of the evening, we acted as if this conversation never happened.
The next day, we found ourselves in Cornwall, eating Cornish pasties and learning of their rich history. And while I loved both the meal and the history lesson, I was busy replaying the event of the previous night, trying to figure out how to talk about it while also sounding nonchalant.
Sinking my teeth into the pasty, chewing on the comforting and hearty filling, I contemplated betrothal, and whether my response was sufficiently enthusiastic but not so much so as to suggest desperation.
For years now, I’ve wanted to learn how to make Cornish pasties, if only because just thinking of them makes me think of that time in England when our lives were less complicated, before a child, a mortgage and several moves. In many ways, our relationship has grown to be a little bit like this sturdy, hand pie favoured by 17th-Century miners. Neither is frilly or fancy, and both are dependable, honest, comforting and nourishing.
Though pasty recipes can be found as early as 13th Century France, Cornish pasties date back to 17th- and 18th- Century England where they became popular with the working class, especially miners, who carried the pasties with them for a midday repast. To put it in contemporary parlance, Cornish pasties are the original Hot Pockets minus the microwave.
At one time, what went inside the pasty was anyone’s guess, prompting Irish cookery writer Theodora FitzGibbon, quoted in the Oxford Companion of Food, to write: “It is said in Cornwall that the Devil never crossed the River Tamar into that county for the fear of the Cornish woman’s habit of putting anything and everything into a pasty.”
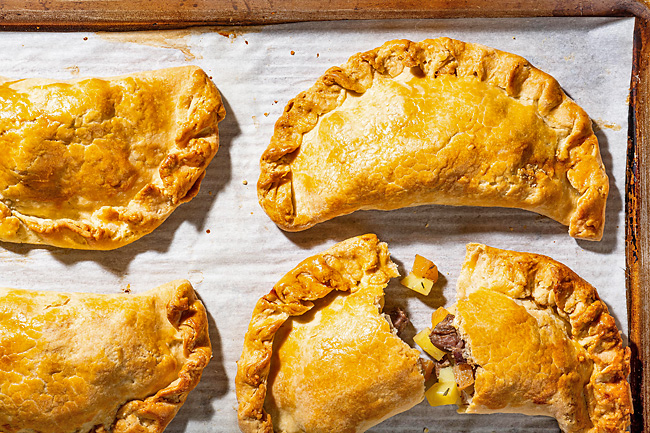
But in 2011, Cornish pasties were granted Protected Geographical Indication status by the European Commission, so to qualify as a Cornish pasty, the pasty must be prepared – though not necessarily baked – in Cornwall; and the filling ingredients must contain potato, onion, rutabaga and cubed beef (usually skirt steak), seasoned with salt and pepper, and encased in short crust pastry, often made with a mixture of oil and butter.
The pasty must also be shaped like a D and have a thick crimp on the side, not on top. The inside of the pasty must remain chunky, with individually identifiable pieces of filling. In the past, miners’ initials were carved into the pastry, most likely to discourage theft, and when the meat prices were too high, the steak was replaced by potatoes, for an all-vegetable pasty.
There’s plenty of lore to explain the thick, crimped crust: Designed as a handle of sorts, it allowed miners to hold the pie in their hands, which were often contaminated with arsenic.
The leftover crusts would get tossed into the mine to encourage the good will of the mine spirits, known as “knockers,” who warned of impending collapse or the location of rich ore.
You can also find photographs with pasties wrapped in paper or cloth, however, suggesting they were probably eaten whole as well.
While trying to nail down the best recipe and testing several versions, I realised a couple of things: Authentic pasty pastry (say that five times fast), is best made using protein-rich bread flour rather than all-purpose, and there’s no such thing as overworking the dough. You want to really knead the pastry to develop gluten and elasticity, which helps to produce a crust that holds its shape and serves as a carrying case for the meal.
When it comes to the filling, you want to chop the ingredients into bite-size chunks sizable enough to maintain their shape after baking. And under no circumstances should you use carrots in the filling, though I’ve yet to find anyone to explain why.
My only tweak is a modest addition of thyme leaves to the filling – the herb commonly used in English cooking complements the meat and vegetables with its earthy fragrance.
I like to make pasties as a hearty supper and serve them to my people. As I go through the process of making and kneading the dough, of carefully chopping the filling ingredients, of shaping, rolling and crimping the pasty, I think of how it’s those unfancy acts of love that add up to something. It’s the everyday work we put into taking care of those we love and that often goes unnoticed, that builds a strong foundation.
CORNISH PASTIES
Active time: One hour
Total time: Two hours, plus at least three hours’ dough resting time
Six servings (makes six pasties)
These hand pies, which have been made for centuries in Cornwall, were granted protected status by the European Commission, meaning only pasties made in Cornwall from a traditional recipe are officially “Cornish pasties,” according to the Cornish Pasty Association.
This recipe closely follows the traditional recipe, using beef, potatoes, onions and rutabaga in a sturdy, durable crust.
Cornish tin and copper miners in the 1700s and 1800s used the thick, crimped edge of crust as a handle that they then discarded after eating, as miners’ hands were dirty and/or carried traces of arsenic. It was common for miners’ initials to be carved into the dough to discourage theft.
British baker Paul Hollywood emphasises the importance of crimping, having been told “you need 21 crimps to make a proper pasty.” If you’re keen on making a traditional pleat, you can watch a few videos online to get a sense, but feel free to crimp and seal the crust however you like.
Make Ahead: The dough needs to be prepared at least three hours and up to two days before baking the pasties.
Storage: The dough can be tightly wrapped and refrigerated for up to two days and frozen for up to two months (defrost in the refrigerator overnight). Assembled and unbaked pasties can be tightly wrapped in plastic wrap, then foil, and frozen for up to two months; bake from frozen, adding 10 to 15 minutes baking time. Leftover pasties can be refrigerated for up to three days; reheat in a 350-degree oven for about 20 minutes before serving.
INGREDIENTS FOR THE DOUGH
– Four cups (500 grammes) bread flour (see NOTES)
– One teaspoon fine salt
– Nine tablespoons (127 grammes) unsalted butter, preferably high-fat European style (may substitute with vegan butter, such as Miyoko’s Creamery brand)
– 3/4 cup (180 millilitres) ice water
FOR THE PASTRY
– 1/2 cup plus one tablespoon (118 grammes) or shortening
FOR THE FILLING
– 12 ounces (340 grammes) skirt steak, cut into 3/4-inch cubes
– 10 ounces (284 grammes) Yukon Gold potato, peeled and diced into 1/2-inch cubes
– Five ounces (150 grammes) rutabaga, peeled and diced into 1/2-inch cubes
– One small yellow onion (150 grammes), diced into 1/2-inch cubes
– One and a half teaspoons minced fresh thyme leaves or 3/4 teaspoon dried
– One teaspoon fine salt
– 1/4 teaspoon freshly ground black pepper
FOR ASSEMBLY
– One large egg
– One tablespoon heavy cream, half-and-half, milk or water
DIRECTIONS
Make the dough: In a large bowl, whisk together the flour with the salt. Add the butter and shortening or lard and, using your fingers, rub it into the flour until the mixture is crumbly, with varied size pieces of flour-covered fat the size of rice and small beans.
Add the water and mix with your hand until a wet, shaggy dough comes together, about two minutes, then knead in the bowl until it becomes elastic, five to eight minutes. The dough will be very sticky, but as you knead, it will become smoother and pull little bits of dough from the sides of the bowl. This is an important step, as proper kneading will develop glutens, giving the pastry the strength needed to hold the filling and retain its shape.
Divide the dough into six equal pieces between 150 and 160 grams each. Shape the dough into disks, wrap them in plastic wrap and refrigerate for at least three hours and up to two days.
Make the filling and assemble the pasties: When ready to bake, position a rack in the middle of the oven and preheat to 425 degrees. Line a large, rimmed baking sheet with parchment paper.
In a large bowl, mix together the meat, potatoes, rutabaga, onion and thyme until combined; you should have about five cups. Season the mixture with salt and pepper and gently toss to combine.
Lightly flour your work surface and, working with one dough piece at a time, remove the dough from the plastic wrap. Lightly flour the dough and the rolling pin and roll out the dough into circles approximately nine inches in diameter.
In a small bowl, whisk together the egg with the cream, half-and-half, milk or water to form an egg wash.
Add a generous 3/4 cup (about 150 grams) of the filling on top half of each pastry circle, brush the border with the egg wash, then fold the pastry over the top and seal in a half-circle. Use your index finger and thumb to crimp and twist the edge, tucking the ends underneath. (You also can use a fork to crimp the edge.) Transfer the pasty to the prepared baking sheet and repeat with the remaining dough and filling.
Using a pastry brush, brush the pasties with the egg wash.
Bake for 15 to 20 minutes, until the pasties start to brown, then reduce the temperature to 350 degrees and continue to bake for another 30 to 40 minutes or until the pasties are a rich golden brown. Remove from the oven, let cool for about 15 minutes and serve.