


Jenny Starrs
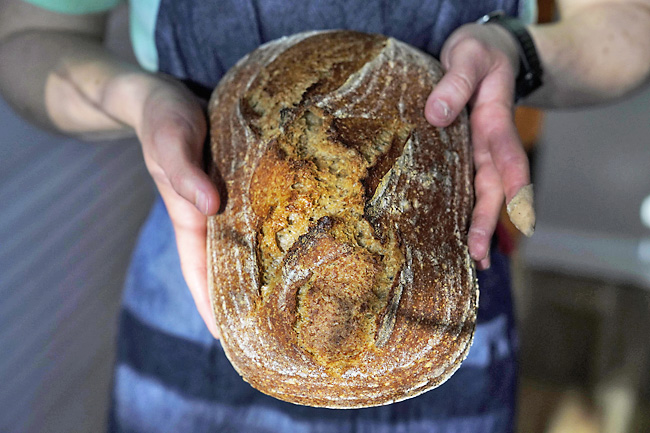
THE WASHINGTON POST – Kernza’s pleasing, molasses-like sweetness makes it a unique replacement for conventional wheat in baked goods. It is a domesticated form of wheatgrass developed by scientists at the nonprofit Land Institute.
When using it in bread, it should be paired with a hard wheat flour, such as bread flour or a high protein all-purpose flour, to ensure a strong structure and decent rise.
As you increase the ratio of Kernza to wheat, the dough will become darker and stickier, and the final loaf will become denser, chewier and more fragrant.
Recipe notes: As with other bread recipes, precision is key. We recommend investing in a kitchen scale and opting for grammes to weigh ingredients instead of using volume measurements.
This recipe requires an active sourdough starter.
You will need about two days to complete the recipe, though most of it is hands-off time. Aim to begin building the levain in the morning and bake the loaves the following morning.
Stored cut side down in a paper bag or bread box, any extra bread will stay relatively fresh on your counter for up to five days.
Slice and freeze any leftovers after that to toast and eat them individually.
KERNZA SOURDOUGH BREAD
Kernza’s pleasing, molasses-like sweetness makes it a unique replacement for conventional wheat in baked goods.
It is a domesticated form of wheatgrass developed by scientists at the non-profit Land Institute. When using it in bread, it should be paired with a hard wheat flour, such as bread flour or a high protein all-purpose flour, to ensure a strong structure and decent rise.
As you increase the ratio of Kernza to wheat, the dough will become darker and stickier, and the final loaf will become denser, chewier and more fragrant.
This recipe calls for 25 per cent whole Kernza flour to 75 per cent bread flour, but you can increase the amount up to one-to-one – which is 520 grammes Kernza to 380 grammes bread flour in the final dough (accounting for the bread flour in the levain) – to feature its sweet, almost nutty taste more prominently.
And you can also easily swap out whole Kernza flour for sprouted Kernza flour.
To maximise the ecological benefits of your loaf, try to source local bread flour made from a hard wheat variety, such as Glenn, Bolles, Turkey Red or Red Fife. And once you’ve opened a bag of whole grain flour such as Kernza, be sure to store it in your fridge or freezer to preserve it.
This recipe is fairly straightforward to halve if two loaves are too much for your household – although an extra loaf of freshly baked bread is one of the best gifts you can give.
As with other bread recipes, precision is key. We recommend investing in a kitchen scale and opt for grams to weigh ingredients instead of using volume measurements.
Make Ahead: This recipe requires an active sourdough starter (see related recipe). You will need about two days to complete the recipe, though most of it is hands-off time. Aim to begin building the levain in the morning and bake the loaves the following morning.
Storage Notes: Stored cut side down in a paper bag or bread box, any extra bread will stay relatively fresh on your counter for up to five days. Slice and freeze any leftovers after that to toast and eat them individually.
INGREDIENTS
For the levain
– 30 grammes active sourdough starter
– 130 grammes water
– 130 grammes bread flour
For the bread
– 290 grammes levain
– 700 grammes water, at room temperature, divided
– 640 grammes bread flour, plus more for shaping and dusting
– 260 grammes Kernza flour (whole, unsifted)
– 20 grammes fine sea or table salt
DIRECTIONS
The day before you want to make the bread (about eight hours before mixing the final dough), make the levain: Combine the active sourdough starter, water and bread flour in a large mixing bowl. Using a wooden spoon or flexible spatula, mix well, cover and leave to ferment at room temperature for six to eight hours, until at least doubled in size.
Start the bread dough
Once the levain is fully risen but has not yet started to collapse, it’s time to mix the final dough.
A good sign that your levain is at its peak is if the bubbles are still protruding above the surface of the mixture, rather than sinking into it.
Add 680 grammes of the water, the bread flour and Kernza flour on top of the levain in the large bowl. Using a wooden spoon or flexible spatula, mix well to fully hydrate the flour. You shouldn’t see any dry pockets of flour.
Pour the salt and remaining 20 grammes of water over the top of the dough, but do not mix it in just yet. Cover the bowl and leave to rest for 30 minutes at room temperature for a modified autolyse (this allows the flour to fully hydrate and prevents the salt from tightening the dough too quickly, keeping it easy to stretch).
Start kneading
Work the salt and additional water into the dough by pinching and folding the dough until it is fully incorporated, then give the dough a few kneads or folds to start building up the dough strength.
When folding the dough, you want to test its elasticity by picking up one side of the dough, stretching it out as far as you can without tearing, and then folding it back over the dough. Rotate and repeat three more times, one for each side, to make up one series of folds.
The dough will stretch less and less as you rotate and repeat; that’s normal. Scrape down the sides of the bowl, cover, and leave to ferment at room temperature for one hour.
Repeat the folding, and rest the dough for another hour.
Repeat the folding a third time, followed by another one-hour rest, for a total of three hours’ fermentation time.
Shaping
At the end of bulk fermentation, the dough will be less sticky and more smooth, with a few bubbles as the sourdough does its leavening work.
Lightly flour a clean work surface and turn the dough out onto it. Divide it into two pieces of roughly 950 grammes each.
Taking the first piece, pat it out into a rough rectangle (about seven by 12 inches), without any air pockets. If using oval bannetons or bowls, you’ll want to shape batards. Stretch the two corners closest to you out and into the centre of the dough, so that it resembles a bicycle seat.
Then, with the short side facing you, roll the dough into a log-shape, trying to seal and tuck the roll as you go to create some tension on the outside of the dough, which will help with shape and rise.
When you’re done rolling, tuck the edges under so the middle is slightly raised. Repeat with the second piece of dough.
If using round bannetons or bowls, you’ll want to shape boules. Stretch each corner out and into the center of the dough, so that it resembles a little dough package.
Then, fold the dough in half so the smooth side is facing up and work your hands in a cupping motion around the loaf, your pinkies pressing against the countertop and under the bottom of the dough mass, to rotate it in a circle and push the dough into the surface of the table to create tension.
You should feel and see the surface of the dough become more taut.
Proofing
If using bannetons, lightly flour the baskets, being sure to dust each ridge. Then, lightly flour the tops of the loaves and place them in the baskets to proof, seam-side facing up.
If using bowls and parchment paper, make sure the parchment pieces hang over the sides of the bowls enough for you to comfortably grab and lift them later.
Place the loaves in the parchment-lined bowls with the seam-side facing down, smooth-side up, for easier transfer.
Let proof on the counter for one hour, then cover and move the dough to the fridge for a final cold proof, for four to 24 hours.
Baking day
Position the baking rack in the middle of the oven, and on it place a large Dutch oven with a lid.
Preheat to 450 degrees for at least 30 minutes.
Carefully remove the heated Dutch oven from the oven. If using a banneton, you can either gently turn the loaf out into the Dutch oven or onto an extra piece of parchment paper, with plenty of extra paper on the edges to grab, making sure the smooth upper surface is facing you.
This can be handy if your Dutch oven is particularly high-walled and you don’t want to reach in to score your loaf. Score the loaf by using a lame, razor blade or sharp knife to cut three deep slashes parallel to each other into the top of the loaf, being mindful of the hot sides of the Dutch oven.
Then, if using parchment, carefully grab the extra paper on the sides like a sling and move the parchment-lined loaf into the hot Dutch oven.
Place the lid back onto the Dutch oven and return it to the oven. Bake for 20 to 25 minutes with the lid on, then remove the lid and bake for another 20 to 25 minutes to set and bronze the crust.
The loaf should sound hollow when tapped.
Remove the loaf from the Dutch oven, transfer to a wire rack, and repeat the scoring and baking process with the second loaf. Let the loaves cool fully, for approximately two hours, before slicing.